Overview
NRS ComplianceGuardian is an all-in-one web based tool that has been built to assist compliance professionals in keeping up with a myriad of new rules and regulations. It will assist you in completing the necessary compliance tasks of your firm and will keep you updated throughout the year on any compliance related changes.
Included in NRS ComplianceGuardian are tools for managing and maintaining your Policies and Procedures, Code of Ethics, Privacy Statements as well as your Form ADV. NRS ComplianceGuardian also includes a powerful research tool which gives users access to state-by-state requirements, SEC, FINRA Rules and Regulations as well as an archive of news articles. Additionally, NRS ComplianceGuardian contains model investment adviser contracts for you to customize for your firm, personal securities trading documents and guides covering, among other things, best practices and disaster recovery.
How To
This "How To" section provides quick instructions on how to perform common tasks with NRS ComplianceGuardian. More detailed information on specific steps can be found in the individual component sections.
Creating an initial set of Policies and Procedures
To setup an initial set of Policies and Procedures, the firm's administrator must perform the following tasks before an active version of their firm's manual is ready and can be viewed by users. Access to the following steps can be found by going to Administration, then My Manuals.
- Complete the Policies and Procedures Profile by going to Administration/My Manuals and select Complete/Edit Profile from the drop down.
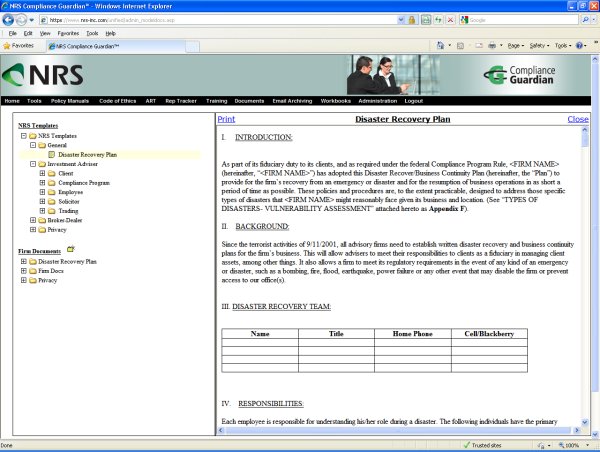
- Review/Edit the material for each section, adding comments, modifying procedures, or adding entirely new sections as needed. The NRS model policies and procedures are a good starting point, but they cannot accurately describe a firm's specific policies and procedures.
- Publish (make active) the working draft.
- Edit and enable the e-mail template that will be sent to each user introducing them to the manual and explaining how to access it.
Administrators also have the ability (if needed) to:
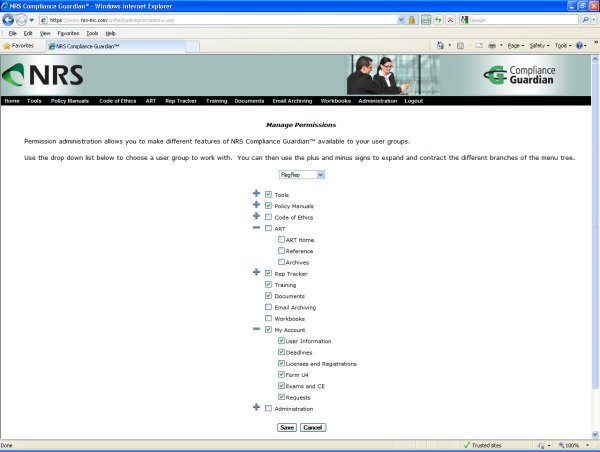
- Change the display order of the policies, add policies and disable sections.
- Upload attachments/addenda to their manual
- Have users electronically attest to having read and understood the manual.
Creating an initial Code of Ethics
To setup an initial Code of Ethics, the firm's administrator must perform the following tasks before an active version of their firm's code is ready and can be viewed by users.
- Complete the Code of Ethics Profile by going to Administration/My Manuals and select Complete/Edit Profile from the drop down.
- Review the material for each section modifying content as needed, or adding entirely new sections as they see fit. The NRS model language is a good starting point, but should be tailored to accurately describe your firm's code of ethics.
- Publish (make active) the working draft.
- Edit and enable an e-mail template that will be sent to each user introducing them to the Code of Ethics and explaining how to access it.
Administrators also have the ability (if needed) to:
- Change the display order of the different sections
- Upload attachments/addenda to their code
- Have users electronically attest to having read and understood the code.
- Distribute and maintain a restricted securities list.
Formatting Text in NRS ComplianceGuardian
There are several places within NRS ComplianceGuardian where users require word processing capabilities (e.g. when editing the content of the policies and procedures). For these situations NRS has incorporated a WYSIWYG (what you see is what you get) editor that allows you to graphically edit your content like you would in any word processor.
Due to the fact that the word processors in ComplianceGuardian are HTML
based, by default, hitting the Enter key will insert a paragraph break as
opposed to a line break. To insert a single line break, hold down the Shift key
on your keyboard and press Enter once. This will work in all sections of
ComplianceGuardian.
Whenever you click in a field that allows word processing a floating toolbar
will appear that will include buttons for each of the formatting function. These
include Bold, Underline, Italics, Font Type, Font Size, Indents, Bulleted Lists,
Numbered Lists, and many others. Along with these formatting functions the
toolbar contains drop down lists for selecting font face and size. The standard
buttons and their functions are as follows:
 Copy
Copy |
 Hyperlink
 |
 Cut Cut |
 Horizontal Rule
 |
 Paste Paste |
 Bold
Bold |
 Select All
 |
 Italic
 |
 Deselect All
 |
 Underline
 |
 Align
Left Align
Left |
 Ordered List
 |
 Align
Center Align
Center |
 Bulleted List
 |
 Align Right
 |
 Find and Replace
 |
 Text Color
 |
 Outdent Text
 |
 Indent Text
 |
 Sub-Script
 |
 Super Script
 |
 Background Color
 |
|
Indent Text |
 Delete Table
 |
 Insert Table
 |
 Insert Table Row
 |
 Set Cell Attributes
 |
 Insert Table Column
 |
 Delete Table Row
 |
 Check Spelling
 |
 Delete Table Column
 |
 Paste
as Text Paste
as Text |
 Background Color
 |
Along with the standard word processing functions the floating toolbar may also contain buttons that perform functions specific to the page that you are on (e.g. creating links to uploaded file attachments in the Code of Ethics and Policies and Procedures.) The extended function buttons are as follows:
| Button | Where Available |
 Link to Attachment
 |
Policies and Procedures and Code of Ethics |
Merge Fields Merge Fields are codes that can be entered into the
content of the Code of Ethics, the Policies and Procedures Manual, and e-mail
templates, that are dynamically replaced with information from the firm profile.
These fields can be very useful when entering repetitive information throughout
your manuals. When using merge fields, if there is ever a change of the
information used in the firm profile, it will be automatically updated
throughout the appropriate documents. For example when referring to your CCO,
enter %CCOName%. Please be aware that Merge fields are case sensitive.
Updating the Policies and Procedures
NRS distributes updates to its
model Policies and Procedures and Regulatory Reference once a quarter to stay
consistent with ever changing regulations and best practices. It is critically
important for you to review these changes and incorporate those that relate to
your business practices into your manual.
Each quarter NRS will notify administrators via e-mail that the latest system
update has been applied and is available for review. A complete update notice
describing the regulatory and system changes can be accessed by clicking
"Administration" and then "System Updates" from the menu bar. This document will
briefly describe any major regulatory activity and how it has impacted the NRS
model policies and procedures and the regulatory reference.
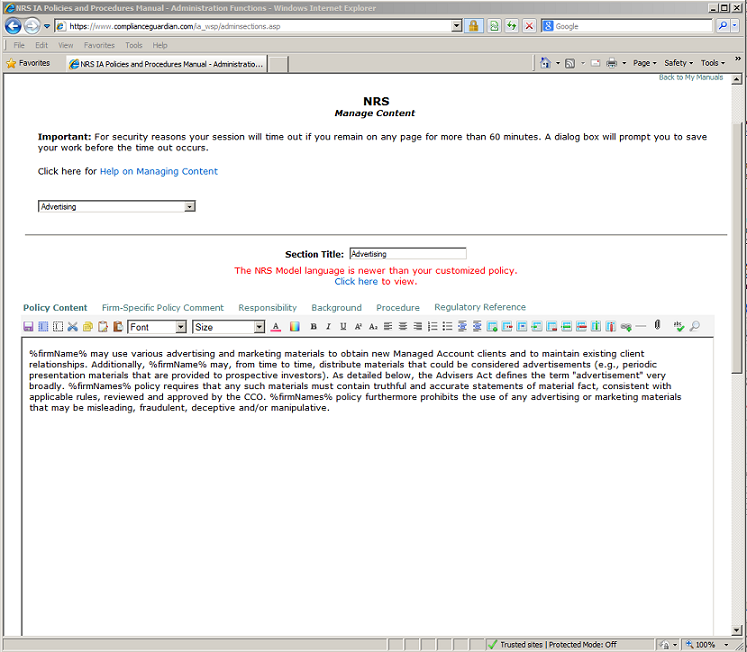
After receiving notification of an update, administrators should review/edit
each of the changed sections by clicking "Administration" and then selecting
"Policies and Procedures Content" from the "Policies and Procedures" portion of
the "Content" sub menu. If you have not changed the NRS model language, changed
text will appear in red and you should confirm that the new language is
appropriate for your firm and business practices.
If you have replaced the NRS model language with your own customized language, NRS' updates will NOT overwrite those changes. Instead, a link will appear above any customized section(s) allowing administrators to view the new default language. After clicking this link, they can either replace their customized section with the new language by clicking the "Update" button or manually incorporate the changes as they see fit.
Important: It is important to note
that different versions of the NRS model language are used based on the answers
you provide in your firm profiles. Some of the changes indicated in the update
notice may apply only to alternative versions of the model language and you will
not see any changes noted by red text.
Once satisfied with the changes, administrators will need to "Publish" their
working draft from the "Manage Versions" page in order for it to become their
active version.
Tools
Advisor Code of Ethics
The Investment Adviser Code of Ethics
tool within NRS ComplianceGuardianis a comprehensive system that allows you to
create, maintain and distribute a Code of Ethics for your investment advisory
business. This web based tool makes it easy for compliance officers to customize
the NRS' model Code of Ethics to suit the business practices of their firm.
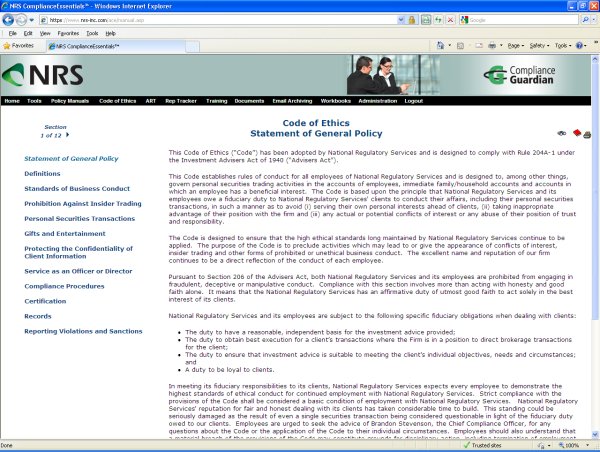
Users can view the current Code of Ethics by clicking 'Code of Ethics' and then
selecting 'Code of Ethics' from the drop down menu.
In addition, NRS updates the Code of Ethics as regulatory changes warrant so
your firm stays current with the most up-to-date requirements and best
practices.
The Code of Ethics tool provides the following functions to assist compliance
professionals in the maintenance and distribution of their code which are
accessible by going to Administration, then My Manuals.
- Code of Ethics Profile - A screen in which administrators answer a series of questions about their firm and its business practices. The system uses the answers to these questions to define which model language is used in creating a Code of Ethics that is customized for your firm.
- Code of Ethics Content An easy to use word processing screen that allows administrators to fully customize any part of the NRS provided sections as well as adding entirely new sections of their own.
- Code of Ethics Versions The Code of ethics tool has a powerful version management system that allows you to keep a historical archive of all versions of your code of ethics. When you edit your code of ethics, you will be making changes to a "working draft". You will then be able to decide when to release the working draft as a new version of your code of ethics. Once you release or publish your code of ethics, no changes can be made to that version.
- Code of Ethics Attachments The system allows you to link to reference documents by using the Manage Attachments function. Administrators can upload any type of file (pdf, doc, rtf etc.) as an attachment to their policies and procedures manual and links to these uploaded attachments can then be displayed as addenda to the manual or embedded directly into customized content.
- Code of Ethics Display Order By default, the system displays the code of ethics with NRS sections first in alphabetical order followed by any user added sections. Administrators have the flexibility to change this display order to meet their needs and display the different sections any order they choose.
- Code of Ethics Attestation - A customizable attestation tool that allows administrators to easily monitor which employees have attested to the code of ethics as well as maintain an archive of past attestations.
- Code of Ethics Forms - This feature allows NRS ComplianceGuardian administrators to make different forms available to their end users.
- Code of Ethics Restricted Securities List - An easy to use tool for maintaining and distributing a list of currently restricted securities.
- Violation Reporting Tool - Available from the Main menu this tool allows users to report (anonymous if they wish) violations to senior management. The firms administrator is informed via email when violations are reported and a second person within the firm can also receive notice of a reported violation by completing the 'Send Violation Report To (second):' in the IA profile.
When you are ready to print your Code of Ethics, you have the option to print
one section at a time or to print the entire code of ethics. These options are
available when viewing your current version or when previewing working draft.
To print one section at a time. Navigate to the
section you wish to print and click the small button at the top of the screen
that looks like a printer
 . This will format the section
in a more printer friendly view. You will now be able to print using your
browsers functions.
. This will format the section
in a more printer friendly view. You will now be able to print using your
browsers functions.
To print the entire Code of Ethics at once, click on the small button at the top
of the screen that looks like a red book![]() .
This will gather all the sections into one document and you will then be able to
print out your entire Code of Ethics or save it as a PDF.
.
This will gather all the sections into one document and you will then be able to
print out your entire Code of Ethics or save it as a PDF.
You may notice when printing your Code of Ethics that the web address is printed
on the bottom of your page and there are headings at the top of each page. This
is an Internet Explorer setting. To remove these, simply go to FILE and PAGE
SETUP, remove the text under Header and Footer. Take note of these settings
prior to removing them as you may wish to have these headers and footers print
for other web pages. Alternatively you may save the document as a PDF using the
"Save as PDF" link and print from the PDF.
Code of Ethics Profile
When first setting up a Code of Ethics within
ComplianceGuardian, an administrator's first task is to complete the Code of
Ethics profile. Completing this profile does the initial customization to create
a working draft that contains the proper model NRS language for each of the
appropriate sections within the code of ethics.
Once you've answered each of the questions click on Finish to save your answers.
This will create the text of your initial working draft which can then be
further customized from the manage content screen.
Code of Ethics Content
To customize the text for any given section of the Code of Ethics Click "Administration" and then select My Manuals and choose 'Edit Content'. Select the appropriate section from the "Select a Section" dropdown list.
Once a section has been selected, the manage content screen allows users to
fully customize the text of the section. When you click in the
editable field it expands to allow for easier customizing, and displays a
toolbar at the top providing users with a wide array of word processing
functionality including Bold, Underline, Italics, Font Type, Font Size, Indents,
Bulleted Lists, Numbered Lists, and many others.
When you are finished editing the section text click the save button at the
bottom of the page. Note: For security reasons user sessions timeout if
you remain on any page for more than 15 minutes (even if you are actively
entering information on the page.) The system will alert users prior to
timing out, allowing them time to save. If for some reason a timeout does occur
while entering information, the user will be redirected to a login page where
they must login in order for their data to be saved.
Code of Ethics Versions
To assist administrators in complying
with the books and records requirements NRS has incorporated the concept of
versioning into the code of ethics tool. The manage versions screen for the code
of ethics is available by clicking "Administration" and then selecting 'My
Manuals' and choosing Manage Versions. On this screen administrators can preview
their working draft, "Publish" their working draft, and view archived versions
of their code of ethics.
Any time that an administrator makes a change to their code of ethics whether it
is by editing the firm profiles, managing content or changing the display order,
these changes are being applied to what is called the "Working Draft." This
draft allows administrators to make extensive changes and review them prior to
releasing the changes to their general users. Once an administrator is satisfied
with the working draft, they must "Publish" in order for it to be available to
general users.
To publish the Working Draft of your Code of Ethics and make it your current
version, simply click the link that says "Make this version active" to the
right of the Working Draft. You will be prompted to give your new version a
name.
Whenever you publish a new version of your Code of Ethics, the previous version
is archived and the dates that it was active are recorded. Previous versions of
the Code of Ethics are kept archived so that you may go back and view and/or
print the Code of Ethics that was in effect at any point in time.
Code of Ethics Attachments
The "File Attachments" feature allows
Administrators to upload any type of file (pdf, doc, rtf etc.) as an attachment
to their code of ethics. Links to these uploaded attachments can then be
displayed in the table of contents as addenda or embedded directly into
customized content.
The Manage File Attachments screen allows administrators to upload new files as
well as manage already uploaded files. From this screen Administrators are able
to set a file's "Type" as well as choose whether a file should be displayed as
an addendum and/or as a form.
The "File Type" is the title that will be displayed below the list of sections
if the file is to be displayed as an addendum. It is also what will be displayed
in the "Insert Attachment Link" dropdown list that appears when managing
content. Firms can only have one active file of any given type at a time. When
new files are uploaded (or activated) with the same "Type" as an already active
file the new file will replace the existing file in the list of addenda and all
links embedded in the working draft will be altered to point to the newly
uploaded file.
To add an attachment, click on the Upload File button on the bottom of the
screen. An "Insert File" box appears on your screen. Select/Add the files type,
enter a description and choose "Browse" to choose the file to be uploaded. You
will also have options for "Display as addendum" and "Display as Form." Once you
have chosen all the options, you can click the "Upload" button to add the file
to the system.
Attachments can be displayed in several different ways. The first is to display
the file as an addendum to the code of ethics. If you choose this option, your
attachment will be listed at the bottom of the list of sections that is
displayed when viewing the code of ethics. To have your attachment display as an
addendum, simply click the option "Display as Addendum" when uploading the file.
You can select your attachment and click the edit button if you would like to
choose this option later.
File attachments can also be displayed in the list of forms available to users when they click "Code of Ethics" and select "Forms" from the main menu. To have an attachment display as a form simply check the "Display as Form" check box when uploading the file. To change the 'Display as form attribute of an already uploaded attachment or one of the NRS provided forms simply highlight the file and click the edit button. The edit attachment dialog box will appear allowing you to select or deselect "Display as Form."
File attachments are archived just like normal content.
Code of Ethics Display Order
The "Manage Display Order" function for the
code of ethics is available by clicking "Administration" and then selecting "My
Manuals - Display Order" . This screen provides administrators the ability to
set the order in which sections will appear in the code of ethics. By default,
sections are ordered with all standard sections in alphabetical order followed
by custom sections.
To change the order that sections are displayed, simply select a section from
the table and then use the up and down buttons to change its place in the
display order.
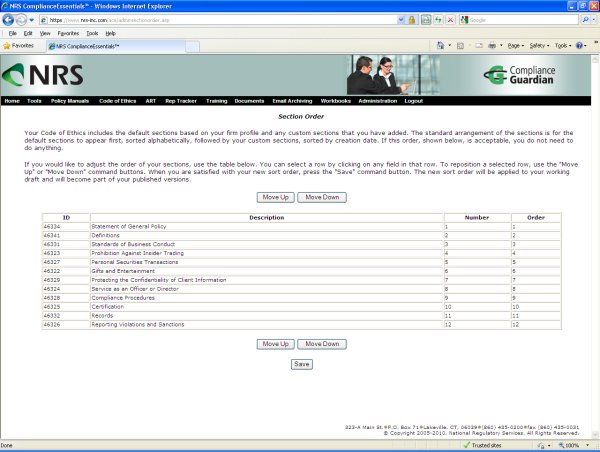
The new display order will not become effective until you publish a new
version of your manual, but will be active in your working draft.
NRS ComplianceGuardian includes a customizable attestation tool that allows administrators to easily gather electronic attestations from employees that have viewed the code of ethics as well as maintain an archive of past attestations.
- To customize the text for the user attestations click "Administration" and
then select "My Manuals - Attestation" from the "Code of Ethics"
portion. The manage attestation text screen allows users to fully customize
the text of the user attestation document. When you click in the section
content field a floating toolbar will appear providing a wide array of
word processing functionality.
When you are finished editing the attestation text click the save button at the bottom of the page. As with any content changes the new attestation text will not be released to your users until you publish your working draft.
- Once there is a current version of the code of ethics, users can
electronically attest to having read and understood it by clicking "Code of
Ethics" and selecting "Attestation" from the menu. Administrators can view
and save user attestations as PDF files by running the "Code of Ethics User
Attestation" report from the Administration - Reports screen.
Code of Ethics Forms
This feature allows NRS ComplianceGuardian administrators to make different forms available to their end users. Users can view these forms when they click "Code of Ethics" and select "Forms" from the main menu. NRS provides the following model forms as well as the ability for administrators to upload their own forms using the file attachment feature.
NRS Annual Employee Questionnaire
NRS Pre-Clearance Review Form
NRS Quarterly Report of Personal Securities Trans
Annual Holdings Report
To upload new forms or to change which forms are available to users,
see the Code of Ethics Attachments section.
Code of Ethics Restricted Securities List
This feature allows administrators to maintain and distribute a list of currently restricted securities to their employees. Administrators can manage the restricted securities list by clicking on "Administration" and selecting "My Manuals" from the "Code of Ethics" manual drop down.
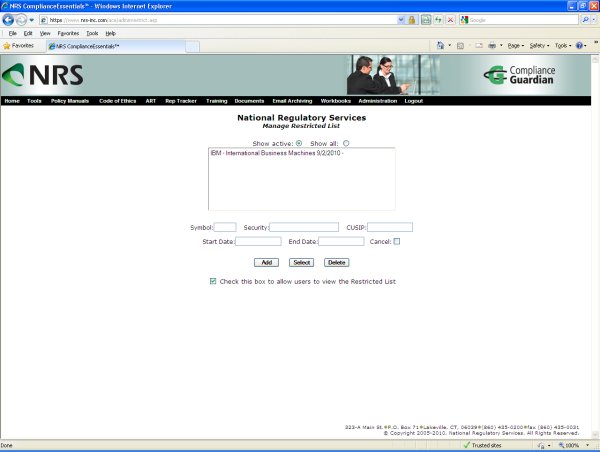
To add a security to the list, simply enter the information into
the different fields and then click the add button. To edit a security that is
already in the list, choose the security from the list and click the "Select"
button. The information for the selected item will be populated into the
different fields where you can make your changes. When finished, click the
update button to save the changes.
Once a restricted securities list has been created and enabled users can view it
by clicking "Code of Ethics" and selecting "View Restricted List" from the menu.
If administrators wish to remove this menu choice for their users they can
simply uncheck the box at the bottom of the "Manage Restricted List" screen.
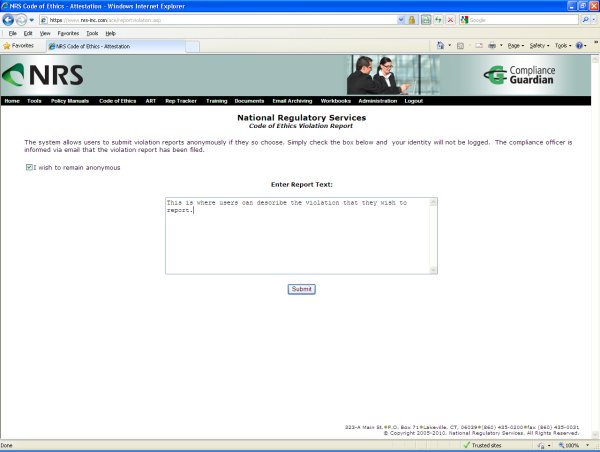
Code of Ethics Violation Reporting Tool
The violation reporting tool provides users with a mechanism for reporting violations to senior management. Users can access this page by clicking "Report a Violation" from the main menu. This provides an area where users can describe the violation they wish to report and a check box allowing them to remain anonymous if they wish. The firm's administrator is informed via email when violations are reported and can view past violation reports at any time from the "Administration," "Reports" screen.
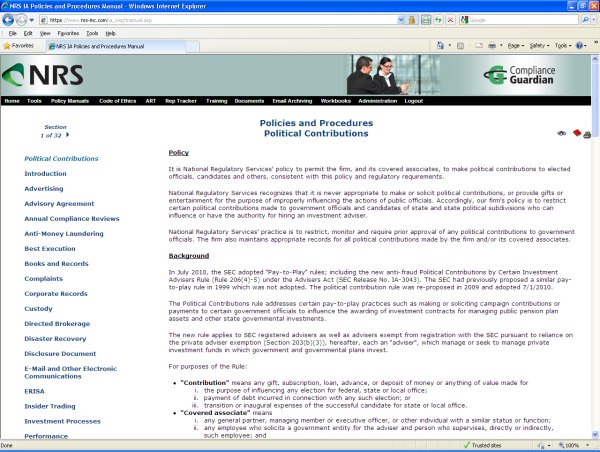
Policies and Procedures
The Investment Adviser Policies and Procedures
tool within NRS ComplianceGuardian is a comprehensive system that allows you to
create, maintain and distribute a Policies and Procedures Manual for your
investment advisory business. This tool makes it easy for compliance officers to
customize NRS' model policies and procedures to suit the business practices of
their firm and meet regulatory requirements.
In addition, NRS updates the policies and procedures on a quarterly basis or as
regulatory changes warrant. These updates will keep your policies current with
the most up-to-date requirements and best practices.
The Polices and Procedures tool provides the following functions to assist
compliance professionals in the maintenance and distribution of their policies
and procedures:
- Policies and Procedures Profile - A screen in which administrators answer a series of questions about their firm and its business practices. The system uses the answers to these questions to define which model language is used in creating a set of policies and procedures that is customized for your firm.
- Policies and Procedures Content An easy to use word processing screen that allows administrators to fully customize any part of the NRS provided policies and procedures and also add entirely new policies of their own.
- Policies and Procedures Versions The Investment Adviser Policies and Procedures tool has a powerful version management system that allows you to keep a historical archive of all versions of your manual. When you edit your manual, you will be making changes to a "working draft". You will then be able to decide when to release the working draft as a new version of your manual. Once you release or publish your manual, no changes can be made to that version of your manual.
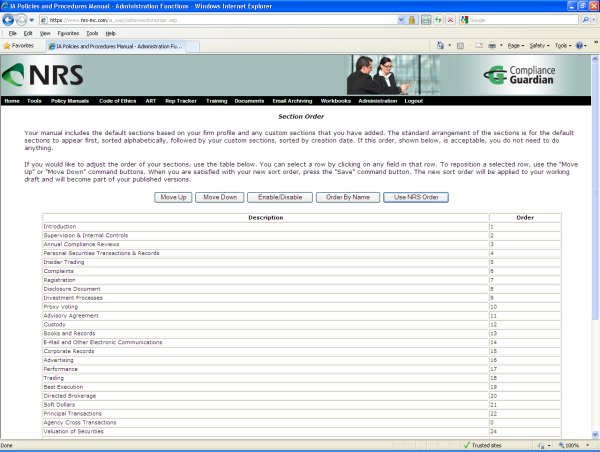
- Policies and Procedures Display Order By default, the system displays the policies and procedures with NRS policies first in alphabetical order followed by any policies that you have added. Administrators have the flexibility to change this display order as well as enable or disable different sections to meet their needs.
- Policies and Procedures Attestation- A customizable attestation tool that allows administrators to easily monitor which employees have attested to the policies and procedures as well as maintain an archive of past attestations.
- Policies and Procedures Attachments The system allows you to link to reference documents by using the "Manage Attachments" function. Administrators can upload any type of file (pdf, doc, rtf etc.) as an attachment to their policies and procedures manual and links to these uploaded attachments can then be displayed as addenda to the manual or embedded directly into customized content.
- Regulatory Reference NRS provides and updates a plain English explanation of the rules and regulations that define the requirements for a firm's policies and procedures.
Policies and Procedures Profile
An administrator's first task in creating a set
of policies and procedures within NRS ComplianceGuardian is to complete the
policies and procedures profile. Completing this profile gives the system the
information it needs to do the initial customization of providing the proper
model language for each section based on the firm's business practices. This
profile can be changed at any time if the firms business practices change. Also
included are the topics relating to compliance tasks which are spelled out in
the policies and procedures. Make sure the timing of these items are consistent
with the firm's timing so that the policies and procedures are the same.
Changing the timing in the profile automatically changes the timing in the
manual.
To complete the policies and procedures profile click on "Administration"
and then select "My Manuals" from the sub menu. On the My Manuals page, choose
the manual you want to work on and select "Profile" from the drop down. Answer
each of the questions by clicking the appropriate answer. Clicking on the
 (Information)
buttons will provide you with additional information to help you answer the
questions. After answering each of the questions you are then able to identify
(if applicable) persons responsible for the areas/functions indicated. Take note
that if you leave any of the responsibility fields blank the system will assume
that the chief compliance office is responsible for that area.
(Information)
buttons will provide you with additional information to help you answer the
questions. After answering each of the questions you are then able to identify
(if applicable) persons responsible for the areas/functions indicated. Take note
that if you leave any of the responsibility fields blank the system will assume
that the chief compliance office is responsible for that area.
When you have finished entering all of the information, scroll down to the
bottom of the page and click "Submit" to save your answers. These changes will
effect the content that is included in your working draft.